Grout Cleaning

Limestone Tiled Kitchen Renovation Whitley Bay

Grubby Limestone Kitchen Floor Cleaned and Sealed in Whitley Bay

I was called by a lady from Whitley Bay who had a Limestone floor installed in her kitchen a few years back, since then it had become very dirty very quickly and looked very dirty. It was now proving very hard to keep clean and looked permanently grubby.

Limestone Tiled Kitchen Floor Before Cleaning Whitley Bay

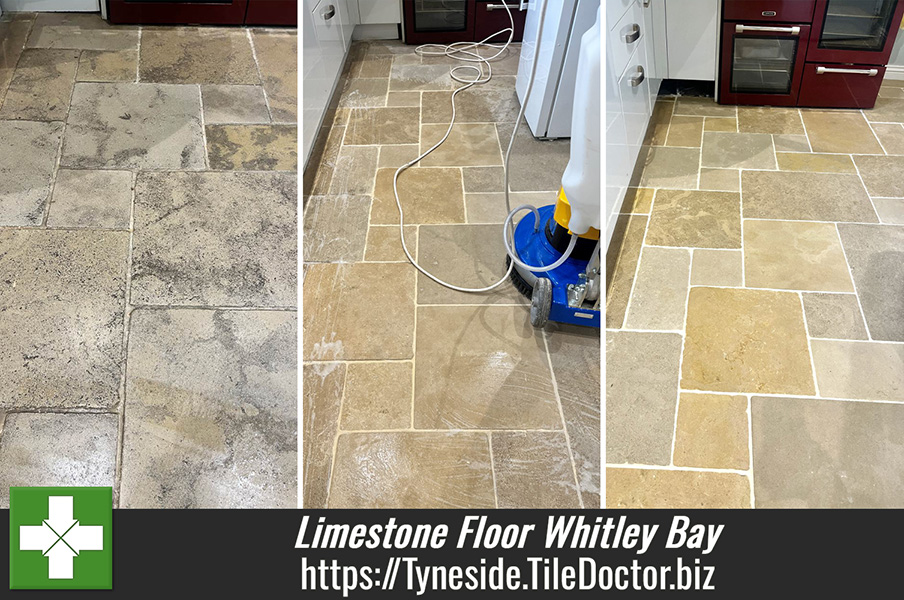
I went over to survey the floor and quickly diagnosed that the sealer which protects the pores of the stone from dirt had worn away leaving it vulnerable. Once dirt becomes ingrained into the stone it becomes very difficult to clean. To give her an idea of how well the tiles could look I deep cleaned a tile in the middle of the floor along with the adjacent grout. The difference was remarkable, especially the grout which really came up and it demonstrated just how dirty the floor was.

Limestone Tiled Kitchen Floor Test Cleaning Whitley Bay

Impressed with the difference, I was asked to work out a quote to deep clean the Limestone tiles and grout and then to seal it with a durable impregnator. Happy with the plan, the quote and start date was agreed.

Cleaning a Limestone Tiled Kitchen in Whitley Bay

Work started with taping up the kicker boards and skirting, as I didn’t want any of the water I’d be using to clean to seep into the underneath and damage them. Kicker boards are usually made of MDF and this is easily damaged by water ingress.

The floor was then given a good vacuum before running over the tiles with a Silicone Carbide Brush fitted to a rotary scrubber. The process was lubricated using a strong dilution of Tile Doctor Remove and Go which on order to break down any remaining sealer and deep clean the stone of grease and ingrained dirt. This generates a lot of soiling which is rinsed off with more water and then extracted with a wet vacuum.

Limestone Tiled Kitchen Floor During Cleaning Whitley Bay

The grout lines were then scrubbed using Tile Doctor Pro-Clean worked in by hand with a stiff brush. The brush does clean the grout but can struggle to get into the recesses of the grout lines so I like to follow up by hand.

After another rinse and extraction with the wet vacuum the floor was left to dry overnight.

Sealing a Limestone Tiled Kitchen

Before applying the sealer, I checked the tiles were dry using a moisture meter in several areas. Applying sealer to a damp floor can result in a patchy appearance so I always check. In this case the floor had dried nicely overnight, and I was able to proceed.

The sealer chosen for this floor was Tile Doctor Colour Grow which is an impregnator that soaks into the pores of the limestone preventing dirt from residing there and ensuring dirt remains on the surface where it can be easily cleaned away. A couple of coats later and the floor looked great with a subtle satin sheen. The colour enhancing formula of the sealer always did a nice job of bringing out the natural colours and tones in the stone.

The floor was transformed by the process and my client was over the moon with the finish. Before leaving I took time to provide some advice on how to maintain the tiles going forward and the importance of using Tile Doctor Neutral Tile Cleaner for day-to-day cleaning.

Limestone Tiled Kitchen Floor After Cleaning Sealing Whitley Bay


Professional Restoration of a Limestone Tiled Kitchen in Tyneside

Grubby Limestone Kitchen Floor Cleaned and Sealed in Whitley Bay Read More »

Marble Tiled Hallway Floor Polishing Newcastle Upon Tyne

Dull Marble Tiled Hallway Given New Lease of Life in Newcastle Upon Tyne

This client from Newcastle contacted Tile Doctor about the condition of the Marble tiled floor in their hallway. Installed twenty years prior wear had taken its toll and it had lost its polished appearance and now looked dull and unflattering.

Marble Tiled Hallway Floor Before Cleaning Newcastle

I paid an initial visit to survey the floor and discuss what could be done to remedy the consultation. It was clear to me the stone simply needed a deep clean, polish and fresh seal to get the floor looking back to its original appearance. After measuring up I worked out what materials would be required to restore the finish and created a detailed quote. The quote was accepted, and a date was agreed to commence the work.

Marble Tiled Hallway Floor Before Cleaning Newcastle

Deep Cleaning a Marble Tiled Hallway

My first task was to protect the woodwork by applying a bead of clear waterproof mastic between the wood and the floor. This prevents water being soaked into the wood through capillary action which can cause water staining and worst-case blow MDF skirting and doors.

Once done work started on polishing the Marble tiles using a 400-grit burnishing pad fitted to a rotary floor machine. This is a coarse diamond pad that is applied with water and removes sealers, old polish and dirt. The water quickly turns into a slurry and once the whole floor had been burnished in this way the soiling was removed with more water and a wet vacuum.

This pad was the first in a set of four burnishing pads that hone the stone and bring up the polish. The next pad is a finer 800-grit which is the first step in re-polishing the Marble and slowly bring the stone back to life. The process was then repeated with a 1500-grit pad, then rinsing and extracting as before.

After this work, I started on the grout lines which were scrubbed by hand using Tile Doctor Pro-Clean which is an alkaline cleaner that will not upset the Marble. The floor was then given a final rinse with clean water and extracted again with the wet vacuum which was used to get the floor as dry as possible before leaving to dry off fully overnight.

Sealing a Marble Tiled Hallway

I called back the next day and started work by checking the stone and grout was dry and ready for a final polish using a 3000-grit diamond pad. This extra fine pad brings up the polish on the floor even further and is applied using a tiny amount of water from a spray bottle which aids in the final polish. Once the whole floor was polished including all the corners and edges it was time to start applying the sealer.

I used Tile Doctor Ultra Seal for this which is an impregnating sealer that adds protection to the stone without altering its natural appearance. The combination of polish and fresh sealer left the floor looking new and put the wow factor back into the hallway.

Marble Tiled Hallway Floor After Polishing Newcastle

Once complete, the hallway floor was transformed with a deep shine, and my client was over the moon with the result. I also discussed future cleaning and recommended Tile Doctor Stone Soap. This is a mild but effective cleaner which helps maintain the patina on the marble.

Marble Tiled Hallway Floor After Polishing Newcastle Marble Tiled Hallway Floor After Polishing Newcastle


Professional Restoration of a Marble Tiled Hallway in Tyneside

Dull Marble Tiled Hallway Given New Lease of Life in Newcastle Upon Tyne Read More »

Terracotta Tiled Kitchen Floor Renovation South Shields

Varnished Terracotta Tiled Kitchen Floor Renovated in South Shields

This customer from South Shields had been maintaining their Terracotta tiled kitchen floor with some sort of varnish or polish. This had continued over twenty years and resulted in dirt becoming locked into the floor and the tiles becoming very dark. The owner felt the floor had lost its original appeal and wanted the whole floor stripping, deep cleaning and then re-sealing.

Terracotta Tiled Kitchen Floor Before Cleaning South Shields

I went over the property to survey the floor and advise on the steps required to renovate the floor. From this plan I was then able to work out a quotation for doing the work which would take two days. My quote was accepted and a date scheduled for the work to start.

Deep Cleaning a Terracotta Tiled Kitchen Floor

On my return the first task was to start cleaning and stripping the floor using a strong dilution of Tile Doctor Pro-Clean and then Remove and Go. These products work best when left to soak into the tile for ten minutes as this gives the product time to breakdown the soils and old sealers.

A Black scrubbing pad fitted to a rotary machine was then used to scrub the solution into the tile and grout. I also worked a stiff brush along the grout lines by hand to get them as clean as possible. The floor was rinsed, and the soiling extracted with a wet vacuum.

Terracotta Tiled Kitchen Floor During Cleaning South Shields

Once done the Terracotta tiles and grout were inspected and any stubborn areas re-treated using the same process until I was satisfied the tile, and grout was as clean as possible and free of previous coatings. After a final rinse to remove any trace of cleaning product the wet vacuum was used to remove as much moisture as possible. The floor was then left to dry off overnight.

Terracotta Tiled Kitchen Floor During Cleaning South Shields

Sealing a Terracotta Tiled Kitchen

The next day the floor was checked for moisture to ensure it was dry enough to be sealed. The results were acceptable so I made a start on applying the sealer which for this floor we used Tile Doctor Seal & Go.

Terracotta is made from clay and as a result is a very porous material, because of this it took ten coats sealer before it was fully sealed. Seal & Go is a water-based product and so doesn’t leave a smell as it dries, it works well on Terracotta and resulted in an appealing satin finish. The sealer will ensure dirt remains on the surface where it is easily cleaned away.

Terracotta Tiled Kitchen Floor After Cleaning Sealing South Shields

Once complete the Terracotta floor looked so much cleaner, lighter and fresher with a subtle sheen. For maintenance, I recommended the use of Tile Doctor Neutral Cleaner for regular cleaning which will ensure the newly applied sealer retains its integrity. Many household cleaning products are simply too strong and will strip away the sealer with use.


Professional Restoration of a Terracotta Tiled Kitchen in Tyneside

Varnished Terracotta Tiled Kitchen Floor Renovated in South Shields Read More »

Scroll to Top